AEM workflow and AEM launcher

How to configure Launcher with AEM workflow in AEM cloud

Configuring AEM launcher with an AEM workflow in AEM as a Cloud Service, you can follow these steps:

  1. Design the Workflow Model: Using the AEM Workflow Model Editor, design your desired workflow model. Define the steps, participants, and actions involved in the workflow. Ensure that your workflow model is complete and ready for execution.
  2. Access the Launcher Configuration: Log in to the AEM Cloud Service author instance and navigate to the “Tools” menu. From there, select “Cloud Services” and then choose “Workflow Launchers” under the “Operations” section.
  3. Create a New Launcher: In the Workflow Launchers configuration, click on the “+ New” button to create a new launcher.
  4. Configure the Launcher: Specify the properties for the launcher, including:
    • Title: Provide a descriptive title for the launcher.
    • Path: Define the content path or resource type that will trigger the launcher. For example, “/content/mysite” or “myproject/components/page”.
    • Event Type: Select the event type that should trigger the launcher, such as “modify,” “create,” or “delete.”
    • Workflow Model: Choose the workflow model you designed in step 1 from the drop-down list.
  5. Save and Enable the Launcher: Save the launcher configuration and ensure that it is enabled by toggling the “Enabled” switch. Click on “Save” to apply the changes.
  6. Test the Configuration: Create or modify content that meets the trigger conditions set in the launcher configuration. The launcher should detect the event or condition and automatically initiate the associated workflow.
  7. Monitor Workflow Execution: Use the AEM Workflow console to monitor the execution of workflows. Track the progress of individual workflow instances, review task assignments, and access reports on workflow execution.
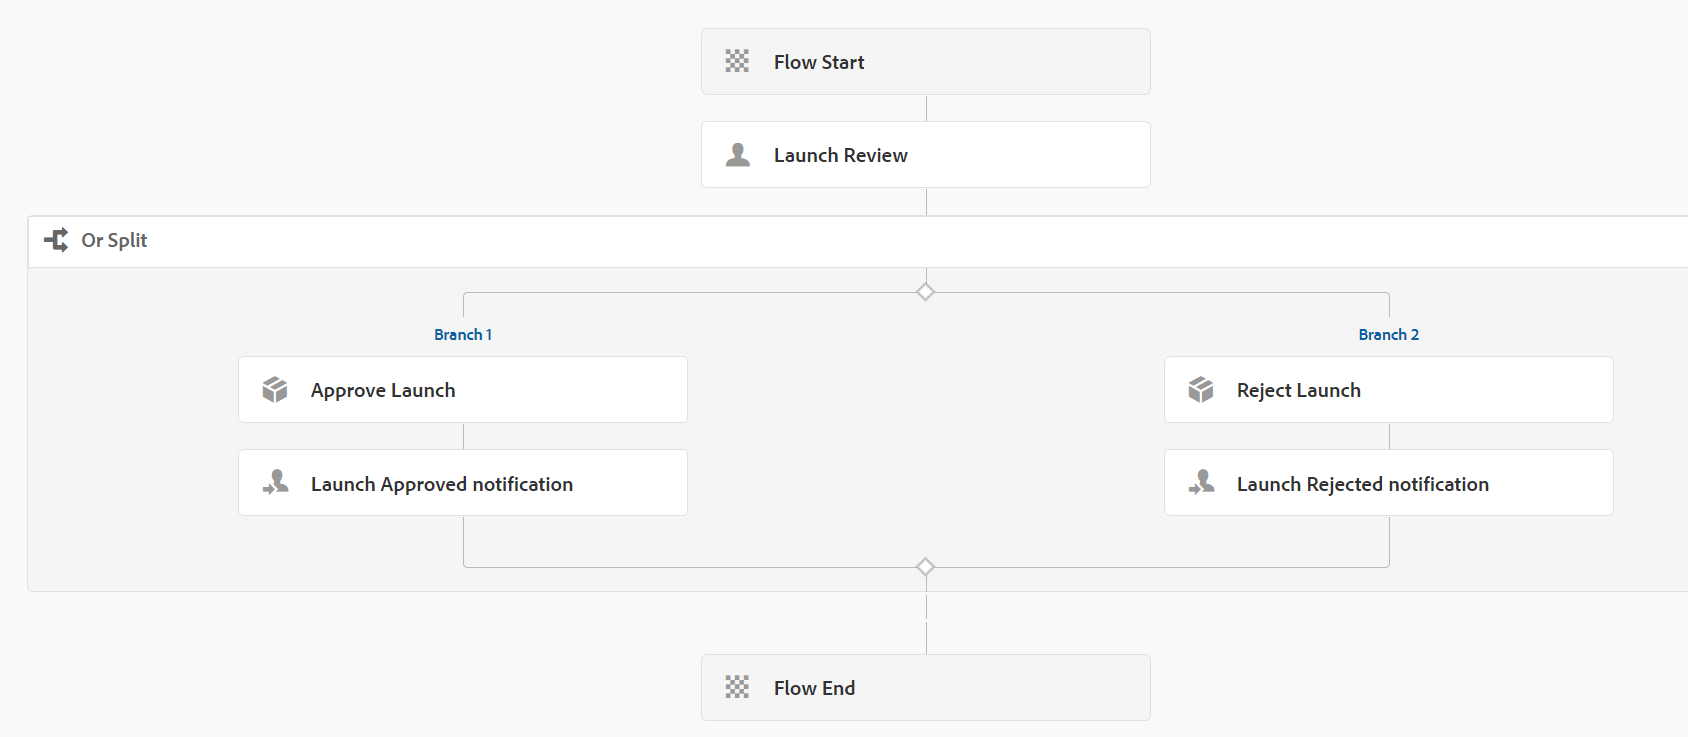
AEM workflow

AEM Workflow

An AEM workflow, in the context of Adobe Experience Manager (AEM), refers to a sequence of predefined steps or actions that automate content management processes within the AEM environment. It is a workflow engine built into AEM that allows organizations to create, manage, and execute workflows to streamline content creation, review, approval, and publishing processes.

AEM workflows are designed to facilitate collaboration among different stakeholders involved in content management, such as content authors, reviewers, editors, and approvers. Each stakeholder performs specific tasks within the workflow, following a predefined sequence of steps. Workflows can be customized to match the organization’s specific requirements and can be created using a visual interface provided by AEM, such as the Workflow Modeler.

The key features and capabilities of AEM workflows include:

  1. Automation: Workflows automate routine and repetitive tasks, reducing manual effort and ensuring consistency in content management processes. They can automatically trigger actions based on specific events or conditions, such as content creation, modification, or publishing.
  2. Task Assignment and Tracking: Workflows assign tasks to individuals or groups at each step, ensuring clear roles and responsibilities. Workflow participants can track the progress of tasks assigned to them and receive notifications for pending actions.
  3. Workflow Models: A workflow model serves as a template or blueprint for creating and executing workflows. It defines the sequence of steps, actions, and rules that govern the workflow. Workflow models can be customized and reused to streamline similar content management processes.
  4. Workflow Steps: Workflow steps represent individual actions or tasks within a workflow. AEM provides a set of predefined steps that cover common content management activities, such as content creation, review, approval, and publishing. Custom workflow steps can also be developed to cater to specific requirements.
  5. Workflow Routing and Rules: Workflows can include routing rules to determine the flow of content and decision points based on specific conditions. Routing rules allow for dynamic branching and conditional actions within the workflow, ensuring content follows the appropriate path based on predefined criteria.
  6. Workflow Instances and History: AEM tracks and maintains records of workflow instances, allowing users to monitor the progress, history, and status of ongoing or completed workflows. This provides transparency and visibility into the workflow execution and facilitates workflow management and troubleshooting.

AEM workflows are like helpful assistants that automate content management tasks, making your life easier in Adobe Experience Manager. By reducing manual work, minimizing errors, and streamlining collaboration, workflows save you time and effort. So, embrace the power of AEM workflows and enjoy smoother content management in Adobe Experience Manager!

AEM Launcher with AEM Workflow model

To configure a launcher with an AEM workflow in AEM 6.5, you can follow these steps:

  1. Design the Workflow Model: Using the AEM Workflow console, design your desired workflow model. Define the steps, participants, and actions involved in the workflow. Ensure that your workflow model is complete and ready for execution.
  2. Access the Launcher Configuration: Log in to AEM and navigate to the OSGi Configuration console, which is typically available at http://localhost:4502/system/console/configMgr.
  3. Create a New Launcher: In the OSGi Configuration console, search for “Day CQ Workflow Launcher” configuration and click on it. Then, click on the “New Configuration” button to create a new launcher.
  4. Configure the Launcher: In the launcher configuration, specify the properties as follows:
    • Title: Provide a descriptive title for the launcher.
    • Path: Define the content path or resource type that will trigger the launcher. For example, “/content/mysite” or “myproject/components/page”.
    • Event Filter: Specify the event or condition that should trigger the launcher. For example, “modify”, “create”, or “delete”.
    • Workflow Model: Select the workflow model you designed in step 1 from the drop-down list.
  5. Save and Enable the Launcher: Save the launcher configuration and ensure that it is enabled by checking the “Enabled” checkbox. Click on “Save” to apply the changes.
  6. Test the Configuration: Create or modify content that meets the trigger conditions set in the launcher configuration. The launcher should detect the event or condition and automatically initiate the associated workflow.
  7. Monitor Workflow Execution: Use the AEM Workflow console to monitor the execution of workflows. Track the progress of individual workflow instances, review task assignments, and access reports on workflow execution.

Refer the video to hands on how to configure Launcher with AEM workflow

Workflow Model and AEM Launcher

Workspace Filter in AEM

The filter is used to define what parts of the JCR repository will be inport or export during package installation or un-installation.

The filter.xml file is present under META-INF/vault. filter.xml has below structure. It consist a set of filter elements which is having a mandatory root attribute and optional include and exclude child elements.

<?xml version="1.0" encoding="UTF-8"?>
<workspaceFilter version="1.0">
    <filter root="/apps/techiearchive">
        <exclude pattern="/apps/techiearchive/install" />
    </filter>
    <filter root="/etc/clientlibs/techiearchive"/>
    <filter root="/etc/notification/email/html/techiearchive"/>
</workspaceFilter>

Filter elements

The filter elements are independent of each other and define include and exclude patters for subtrees. The root of a subtree is defined by the root attribute, which must be an absolute path.

The filter element can have an optional mode attribute which specified the import mode used when importing content. the following values are possible:

replace

This is the normal behavior. Existing content is replaced completely by the imported content, i.e. is overridden or deleted accordingly.

merge

Existing content is not modified, i.e. only new content is added and none is deleted or modified.

update

Existing content is updated, new content is added and none is deleted.