Download and upload aem packages using shell script

Using shell script you can download packages from source instance and upload into destination instance

# packages.txt 
service pack: aem-service-pkg-6.5.4.zip 
AEM forms: AEM-Forms-6.5.4.0-OSX-6.0.138.zip
#!/bin/bash
FILE="/home/prahlad/packages.txt"
TEMP="/home/prahlad/temp"
crx_packmgr_path="/etc/packages/adobe/cq650/servicepack"
source="localhost:4502"
dest="localhost:4503"
# create temp folder.
mkdir $TEMP
# start loop to read file and execute command for each line .
while IFS= read -r line
do
package_name=`echo "$line" | awk '{split( $0,array, ":"); print array[2]}'`
# download packages from source server.
echo $source $crx_packmgr_path $package_name $TEMP | awk '{print("curl -u admin:admin http://"$1 "" $2 "/" $3 " > " $4 "/" $3)}' | sh
wait $!
# upload and install package into destination server.
echo $package_name $dest $TEMP | awk '{print("curl -u admin:admin -F file=@" $3 "/" $1 " -F name="$1" -F force=true -F install=true http://"$2"/crx/packmgr/service.jsp")}' | sh
wait $!
done <"$FILE"

AEM 6.4 upgrade

AEM Upgrade

I have upgrade from AEM 6.2 to 6.4 one of my reputed client. This article covers both upgrade strategies and steps required to do them successfully.

Pre-requisite steps for upgrade

  • Release notes
  • Technical Requirements
    • Adobe recommended lists the supported client and server platforms for Adobe Experience Manager which need to upgrade.
Application/ServerVersion
AEM6.4
Apache2.4
Dispatcher4.2.2
Jdk1.8.0_221
Oak1.8.2
  • Pre-Upgrade maintenance tasks
    • Before beginning your upgrade, it is important to follow these maintenance tasks to ensure that the system is ready and can be rolled back should issues occur.
      • Execute pattern detector and get the report for where we need to do customization or update.
      • Ensure Sufficient Disk Space
      • Fully Back Up AEM
      • Back Up Changes to /etc
      • Configure Workflow and Audit Log Purging
      • Install, Configure, and Run The Pre-Upgrade Tasks
      • Execute Offline Revision Cleanup
      • Execute Data store Garbage Collection
      • Rotate Log Files

Upgrade approaches

There are two type of upgrade approaches
  • In place upgrade
  • Fresh Installation

In Place Upgrade

  • Stop the existing instance eg: AEM 6.2
  • Remove log files from environment
  • Take a backup of quickstart folder
  • Run Offline revision cleanup or offline compaction
    • Download correct oak-run jar compatible with AEM6.2 from below URL https://repo1.maven.org/maven2/org/apache/jackrabbit/oak-run/
    • Shutdown AEM if running
    • (Optional) Use the tool to find old checkpoints: java -jar oak-run-1.4.9.jar checkpoints install-folder/crx-quickstart/repository/segmentstore
    • (Optional) Then, delete the unreferenced checkpoints: java -jar oak-run-1.4.9.jarr checkpoints install-folder/crx-quickstart/repository/segmentstore rm-unreferenced
    • Run the compaction and wait for it to complete: java -jar -Dlogback.configurationFile=logback.xml -Xmx8g oak-run-1.4.9.jar compact install-folder/crx-  quickstart/repository/segmentstore
    • After executing compaction the repository size has been reduced from 19 GB to 2.69 GB
    • Replace AEM6.2 jar with AEM 6.4
    • Preparation of the AEM quickstart jar file java -Xmx4096m -jar aem6.4_quickstart-author-p4502.jar –unpack
    • Execute repository migration command java -Xmx4096m -jar aem6.4_quickstart.jar -v -x crx2oak -xargs — –load-profile segment-no-ds
    • Determine the correct upgrade start command. After migrate start AEM with below command java -Xmx8g -Djava.awt.headless=true -Dsling.run.modes=author,crx3,crx3tar -jar aem6.4_quickstart.jar -p 4502 -verbose -nofork -gui -Dsling.properties=conf/sling.properties

Fresh Installation

Software Installation:

Be sure to install and configure the following:
  • Install AEM using the version 6.4 JAR file. (AEM_6.4_Quickstart.jar)
    • Copy your Jar file in your dev location.
      • You will also need to copy in the license.properties file.
      • Double clicking the jar file will install and launch the server.
      • See Debugging for launching the server in debug mode so you can debug using your IDE.
    • Local Author instance should be running on port 4502 (AEM_6.3_Quickstart.jar)
  • Java/JRE 1.8: http://www.oracle.com/technetwork/java/javase/downloads/jdk8-downloads-2133151.html
    • From command line, run ‘java -version’ to confirm your java version is 1.8
  • Apache Maven 3.5.3: http://archive.apache.org/dist/maven/maven-3/3.5.2/binaries/
    • From command line, run ‘mvn -version’ to confirm your maven version is 3.X
    • Make sure you download the binary.
  • Eclipse latest version (java EE): https://www.eclipse.org/downloads/
    • NOTE: Those who have an IntelliJ license or prefer another IDE may use then but note that this document will not support the setup

Post Upgrade Checks

  • Repository is migrated properly. (Below completion message will appear)

(05.06.2018 09:26:28.353 INFO   c.a.g.c.e.MigrationRunner: migration completed )

 __   __         __        ___ ___  ___  __

/  ` /  \  |\/| |__) |    |__   |  |__  |  \

\__, \__/  |  | |    |___ |___  |  |___ |__/

  • Oak version is 1.8.2
Oak version
  • Check product info
AEM product info
  • Check the runmode
Apache sling settings
  • AEM 6.4 system overview
AEM system info
  • Site.html, login.html is working
  • Crxde , crx explorer, felix console are working
  • Some of the dependencies has been changed in pom files
aem-maven-tooling/global-parent/pom.xml

<dependency>
        <groupId>com.adobe.aem</groupId>
       <artifactId>uber-jar</artifactId>
       <version>6.2.0</version>   DELETED
       <version>6.4.0</version>   ADDED
       <classifier>apis</classifier>
       <scope>provided</scope>
</dependency>

acs-commons version modified

<acs-aem-commons.version>3.13.0</acs-aem-commons.version>  DELETED

<acs-aem-commons.version>3.17.0</acs-aem-commons.version>  ADDED

About Dispatcher

Dispatcher is Adobe Experience Manager’s caching and/or load balancing tool. Using AEM’s Dispatcher also helps to protect your AEM server from attack. Therefore, you can increase the security of your AEM instance by using the Dispatcher in conjunction with an enterprise-class web server.

  • Caching: It is used to cache as much content as possible in the form of a static website, which helps to reduce the continuous calling for generating content when website data is dynamic.
  • Load-balancing:  If there are multiple cq instances configured with a dispatcher, the dispatcher can do a load-balancing and if there is too much load on any cq instance, it can relay the request to another less busy instance.    
Dispatcher uses the following method for content caching:
  • Content Updates invalidates those pages whose content has been updated and replaces it with new content.
  • Auto-invalidation automatically invalidates the content parts which are out of date – without physically deleting any files.
How dispatcher performs load-balancing?
  • Performance Statics: Dispatcher keeps statistics on how fast each instance of cq is responding to a particular url. Based on those metrics, dispatcher determines which instance of cq will fetch the quickest response for any request and relays the request to that cq instance
  • Sticky Connections: when a user session is established, then all incoming requests from that user should be served by the same cq instance, because other cq instances cannot recognize the user session and generate personalized pages for him. Dispatcher makes sure all requests for user session are served from the same cq instance..
  • Increase fail-safe coverage: If the Dispatcher does not receive responses from an instance, it will automatically relay requests to one of the other instance.

OSGI

The OSGi Alliance, formerly known as the Open Services Gateway initiative. The OSGi specification describes a modular system and a service platform for the Java programming language that implements a complete and dynamic component model, something that does not exist in standalone Java/VM environments. Applications or components, coming in the form of bundles for deployment, can be remotely installed, started, stopped, updated, and uninstalled without requiring a reboot; management of Java packages/classes is specified in great detail. Application life cycle management is implemented via APIs that allow for remote downloading of management policies. The service registry allows bundles to detect the addition of new services, or the removal of services, and adapt accordingly.

Architecture

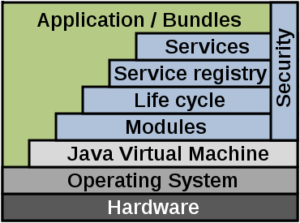
OSGi (Open Service Gateway Initiative) is a Java framework for developing and deploying modular software programs and libraries. Each bundle is a tightly coupled, dynamically loadable collection of classes, jars, and configuration files that explicitly declare their external dependencies (if any).
The framework is conceptually divided into the following areas:

Bundles
Bundles are normal JAR components with extra manifest headers.
Services
The services layer connects bundles in a dynamic way by offering a publish-find-bind model for plain old Java interfaces (POJIs) or plain old Java objects (POJOs).
Services Registry
The application programming interface for management services (ServiceRegistration, ServiceTracker and serviceReference)
Life-Cycle
The application programming interface for life cycle management (install, start, stop, update, and uninstall) for bundles.
Modules
The layer that defines encapsulation and declaration of dependencies (how a bundle can import and export code).
Security
The layer that handles the security aspects by limiting bundle functionality to pre-defined capabilities.
Execution Environment
Defines what methods and classes are available in a specific platform.

    Difference between osgi service and component in AEM


    OSGi Component


    If we want any object to be managed by the OSGi container, we should declare it as a component. Using annotations, we could make a POJO a OSGi component by annotating it with @Component. With this, we will get the ability to start, stop and configure the component using the felix web console. All objects managed by OSGi container are components. we qualify components as services. This means that all services are components but not vice-versa.
    OSGi Service

    OSGi components can be made as OSGi service by marking it with @Service annotation. When we mark a component as service, we can this service from other osgi components. Components can call (using container injection – @Reference) other services but not components. In other words, a component cannot be injected into another component / service. Only services can be injected into another component.


    OSGi Component Vs Service
    • All objects managed by OSGi container are components. we can qualify components as services. This means that all services are components but not vice-versa.
    • Components can call (using container injection – @Reference) other services but not components. In other words, a component cannot be injected into another component / service. Only services can be injected into another component.